Tensorflow Lite prebuilt C++ Wrapper
지금 만들어둔 Repository의 submodule이 clone가 안되는 버그가 있다고 댓글로 알려주셔서 수정 중에 있습니다!(2021.08.30)
최대한 빠른 시일 내에 정상화 하도록 하겠습니다. 잠시만 기다려주세요 ㅠㅠ
더불어 Tensorflow Lite 버전 업데이트 및 추가 delegate들도 빌드해놓을 예정입니다.
최근에 바쁘고 귀찮기도 해서 블로그를 방치했는데, 의외로 찾아오시는 분들도 있고, 댓글까지 남겨주시는 분들도 있어서.. 마음먹고 다시 쓰고 있습니다.
Tensorflow Lite C(C++) 라이브러리 및 래퍼를 3개의 플렛폼(Ubuntu(Linux), MacOS, Android) 에서 사용할수 있게 만들어 놓은게 있어서 git clone 만 하면 쉽게 쓰실수 있도록 레포를 공개하려고 합니다. CMake 로 쉽게 쓸 수 있습니다.
https://github.com/lackhole/Tensorflow-Lite
Ubuntu (Linux)
* CPU 가능
* GPU 넣을 예정...
MacOS (Catalina 랑 그 한단계 이전 에서 테스트 됨)
* CPU 가능
* GPU 원래 맥에서는 안됨..
Android
* CPU 가능
* GPU 가능
* NNAPI (API 27 이상에서만) 가능
* armeabi-v7a, arm64-v8a 모두 가능
사용법은 다 똑같으니 보기 편하게 맥의 CLion 에서 한번 해보도록 하겠습니다
예시로 사용할 모델은 Google Object Detector 모델입니다https://www.tensorflow.org/lite/models/object_detection/overview#get_started
Object detection | TensorFlow Lite
Detect multiple objects within an image, with bounding boxes. Recognize 80 different classes of objects. Get started If you are new to TensorFlow Lite and are working with Android or iOS, we recommend exploring the following example applications that can h
www.tensorflow.org
테스트로 사용한 이미지입니다.

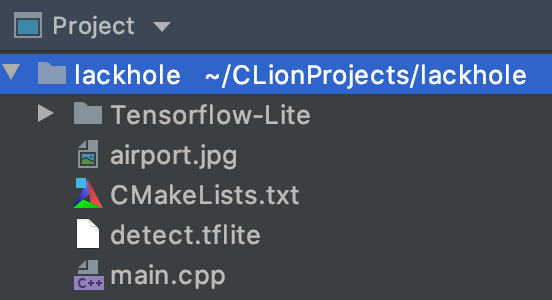
프로젝트 안에서 레포를 바로 가져와서 쓰겠습니다.
레포가 서브모듈로 구성되어 있기 때문에, recursive 명령어로 받아오셔도 무방합니다.
git clone https://github.com/lackhole/Tensorflow-Lite
cd Tensorflow-Lite
git checkout macos
git submodule update --init --recursive
여기서는 맥으로 하고있어서 macos 브랜치를 가져왔습니다. ubuntu 와 android 브랜치도 있으니, 깃헙 링크를 가셔서 한번 보시기 바랍니다


Tensorflow-Lite 안의 구조가 저렇게 잘 나왔으면 이제 Tensorflow Lite 쓸 준비는 끝났습니다.
맥이라서 라이브러리가 libtensorflowlite_c.dylib 으로 나와있습니다.
이제 메인 프로젝트의 CMakeLists.txt에 두 줄만 추가해 주면 됩니다.
cmake_minimum_required(VERSION 3.15)
project(lackhole)

set(CMAKE_CXX_STANDARD 14)

add_executable(lackhole main.cpp)
원래 이런 식으로 적혀있을 텐데,
cmake_minimum_required(VERSION 3.15)
project(lackhole)

set(CMAKE_CXX_STANDARD 14)

add_subdirectory(Tensorflow-Lite)

add_executable(lackhole main.cpp)

target_link_libraries(lackhole PUBLIC tflite)
이처럼 add_subdirectory 와 target_link_libraries 를 추가하면 됩니다.
add_subdirectory 에는 폴더 이름을, target_link_libraries 는 그 폴더 안의 CMakeLists.txt 에 적힌 project 이름을 적어서 서로 연결시켜 주는 것입니다.
여기에 OpenCV 도 필요하니 넣어주겠습니다.
버전은 설치하신 버전으로 알맞게 적어주시면 됩니다 (이것도 넣으면 두줄이 아니라 5줄이군요..)
cmake_minimum_required(VERSION 3.15)
project(lackhole)

set(CMAKE_CXX_STANDARD 14)

find_package(OpenCV 4.1.0 REQUIRED)

add_subdirectory(Tensorflow-Lite)

add_executable(lackhole main.cpp)

include_directories(${OpenCV_INCLUDE_DIRS})

target_link_libraries(lackhole PUBLIC ${OpenCV_LIBS} tflite)
그럼 메인 코드를 대강 작성해 보겠습니다.
맥에서는 GPU 로 구동이 안되서 CPU로 구동시켰습니다.
원래 Linux랑 Android 는 GPU 로 구동시킬 수 있는데, 리눅수는 뭐 까는게 많아서 일단 안드로이드만 GPU 라이브러리를 넣어놨습니다.
안드로이드는 NNAPI 도 지원해서, NNAPI 라이브러리도 빌드해서 넣어놓았습니다.
#include <iostream>
#include <vector>
#include <string>
#include <cmath>

#include "cutemodel/CuteModel.hpp"

#include "opencv2/opencv.hpp"

// 라벨 파일 불러오기 귀찮아서 그냥 코드에 넣었습니다
const std::vector<std::string> labels = {
        "???", "person", "bicycle", "car", "motorcycle",
        "airplane", "bus", "train", "truck", "boat",
        "traffic light", "fire hydrant", "???", "stop sign",
        "parking meter", "bench", "bird", "cat", "dog",
        "horse", "sheep", "cow", "elephant", "bear",
        "zebra", "giraffe", "???", "backpack", "umbrella",
        "???", "???", "handbag", "tie", "suitcase",
        "frisbee", "skis", "snowboard", "sports ball", "kite",
        "baseball bat", "baseball glove", "skateboard", "surfboard", "tennis racket",
        "bottle", "???", "wine glass", "cup", "fork",
        "knife", "spoon", "bowl", "banana", "apple",
        "sandwich", "orange", "broccoli", "carrot", "hot dog",
        "pizza","donut","cake","chair","couch",
        "potted plant","bed","???","dining table","???",
        "???","toilet","???","tv","laptop",
        "mouse","remote","keyboard","cell phone","microwave",
        "oven","toaster","sink","refrigerator","???",
        "book","clock","vase","scissors","teddy bear",
        "hair drier","toothbrush"
};

int main() {

    ct::CuteModel objectDetector;
    objectDetector.buildFromFile("/Users/yonggyulee/CLionProjects/lackhole/detect.tflite");

    objectDetector.setCpuNumThreads(2);
    objectDetector.buildInterpreter();

    if(!objectDetector.isBuilt()) return -1;

    std::cout << objectDetector.summary() << std::endl;

    cv::Mat image = cv::imread("/Users/yonggyulee/CLionProjects/lackhole/airport.jpg");
    cv::Mat cvt;
    cv::resize(image, cvt, {300, 300});

    objectDetector.setInput(cvt.data);
    objectDetector.invoke();

    std::vector<float> rects = objectDetector.getOutput<float>(0);
    std::vector<float> classes = objectDetector.getOutput<float>(1);
    std::vector<float> scores = objectDetector.getOutput<float>(2);
    std::vector<float> numDetect = objectDetector.getOutput<float>(3);


    for(int i=0; i<10; ++i){
        if(scores[i] < 0.5) break;
        cv::Point2d tr{rects[i*4+1] * image.cols, rects[i*4] * image.rows};

        cv::rectangle(image,
                      cv::Point2d{rects[i*4+1] * image.cols, rects[i*4] * image.rows},
                      cv::Point2d{rects[i*4+3] * image.cols, rects[i*4+2] * image.rows},
                      {255,0,0}, 2);

        char buf[10];
        std::sprintf(buf, "(%.1f%%)",scores[i]*100);
        cv::putText(image,
                    labels[std::floor(classes[i]+1.5)] + std::string(buf),
                    cv::Point2d{rects[i*4+1] * image.cols, rects[i*4] * image.rows - 4},
                    cv::FONT_ITALIC, 0.6, {0,0,0}, 2);
    }

    cv::imshow("RES", image);
    cv::waitKey(0);

    return 0;
}
CuteModel 은 C 로 빌드된 Tensorflow Lite 라이브러리를 감싸주는 래퍼입니다. 필요한 함수는 다 들어있으니 CuteModel 을 쓰시는게 훨씬 편합니다. 더 자세한 사용법은 GitHub README 를 참고해주세요 링크

별로 기대 안했는데 학습이 나름 잘 됬나 보군요
뭐 어쨋든 Tensorflow Lite 가 잘 돌아가는건 확인이 됬으니 더 궁금하신 사항이 있으시면 댓글로 남겨주세요~
'TensorFlow' 카테고리의 다른 글
| TensorFlow Lite Python API (0) | 2020.04.05 |
|---|---|
| TensorFlow Lite Java(Android) 사용법 (0) | 2020.04.05 |
| TensorFlow Lite C++ API (0) | 2020.04.05 |
| TensorFlow Lite C/C++ 환경 구축하기(CMake) (2) | 2020.04.05 |
| Android 에서 TensorFlow Lite 사용하기 (Java) (0) | 2020.04.05 |
